
How to Print a Packing Slip for Each Package in ShipStation
Published
Short answer: Yes. ShipStation’s Package Configuration now lets you assign specific items and quantities to each package, and a packing slip can print one section per package. Four things make it work: start from the New Template button rather than copying a pre-built template, remove settings.enable_per_package_sections from the template, wrap each package in a page-break div, and map dimensions to box names, because a multi-package slip receives a package’s dimensions and not its name.
I worked through this for a customer whose packers needed to know exactly what goes in which box. As of November 2026 I can’t find ShipStation documentation for the template side of it, so what follows comes from working in the editor.
Assign the items to each package
Open Package Configuration on the order and add a package for each box. You can pick one of your saved packages or type the dimensions in. Then adjust the quantities on the left and drag each item to its package.
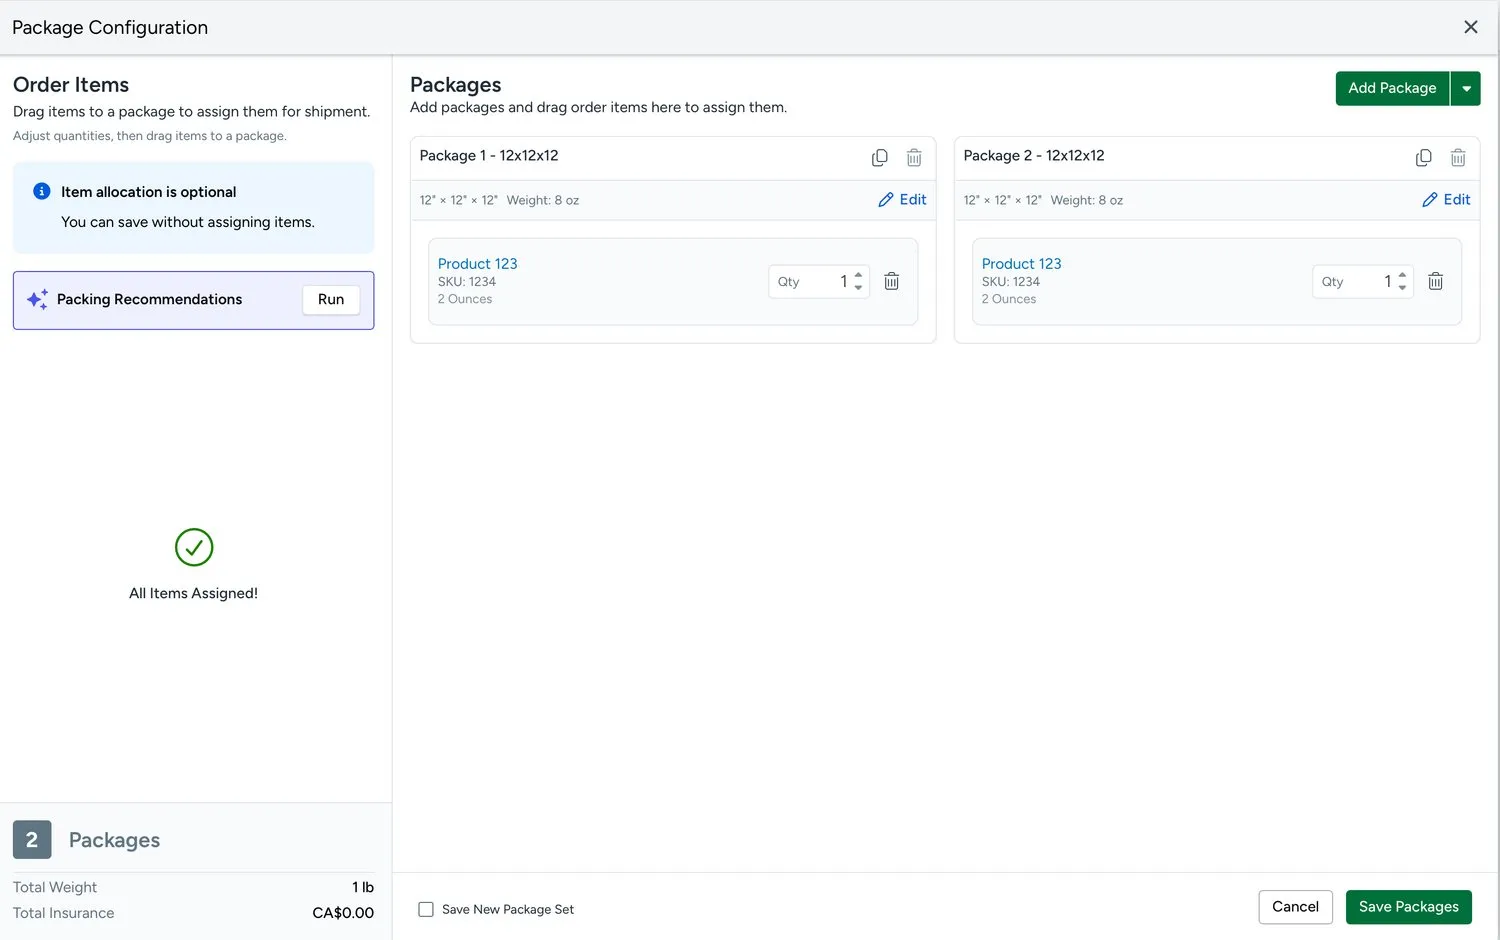
An order line can be divided, as in the screenshot, where two units of one SKU go in separate boxes. The window also says “Item allocation is optional” and lets you save without assigning anything. For a per-package slip, treat it as required: the template below prints a section only for a package that has items in it, so an unassigned package prints nothing.
You don’t have to do this by hand on every order. Packing Recommendations fills in the item assignment as well as the boxes. The Recommend Package rule action applies it at import, and the Run button in this window applies it to one order, so the slip works without anyone dragging items.
USPS doesn’t support multi-package labels, so USPS volume uses split shipments instead. This setup is for carriers that take a multi-package shipment.
Create the template with the New Template button
Go to your packing slip templates and click New Template. Don’t copy one of ShipStation’s pre-built templates, because those use the old template editor. The per-package fields are in the new one, which has the Insert Field and Format buttons and a live preview beside the code.
Remove the setting that doesn’t exist
Scroll to the end of the header section, which is around line 175 of the default template. You’ll find this:
{% if settings.enable_per_package_sections and packages.size > 1 %}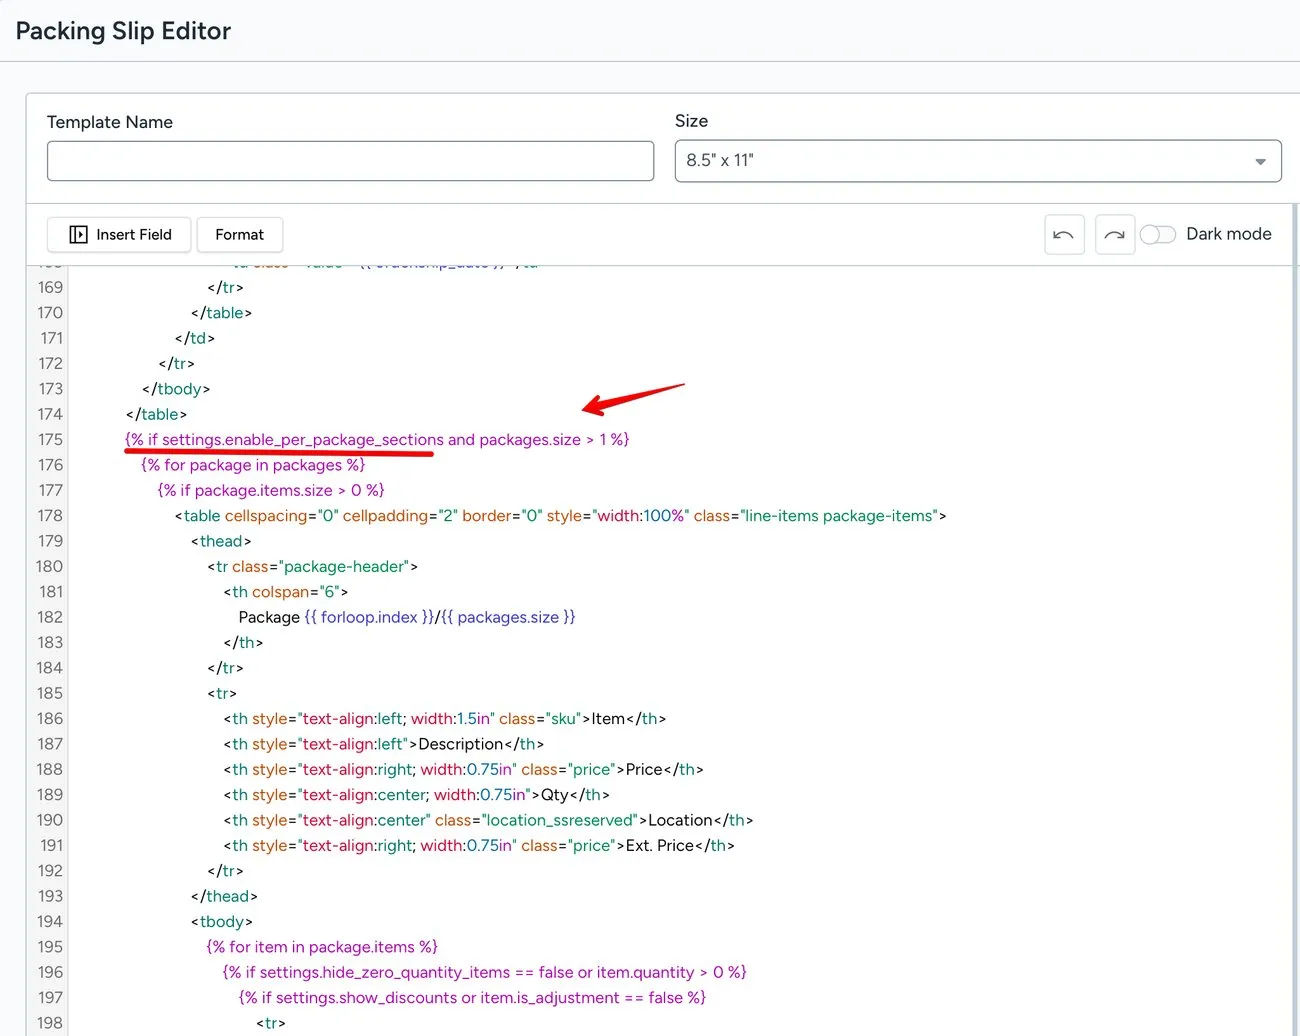
There is no enable_per_package_sections setting to turn on, so the per-package section never runs and you get the normal single list of items. Remove that part of the condition:
{% if packages.size > 1 %}Now any order with more than one package uses the per-package section, and everything else falls through to the normal list after the {% else %}.
Put each package on its own page
As it stands, the packages print one after another on the same sheet. To put each on its own page, open a div straight after the for line:
{% if packages.size > 1 %}
  {% for package in packages %}
    <div style="page-break-after: always;">
      {% if package.items.size > 0 %}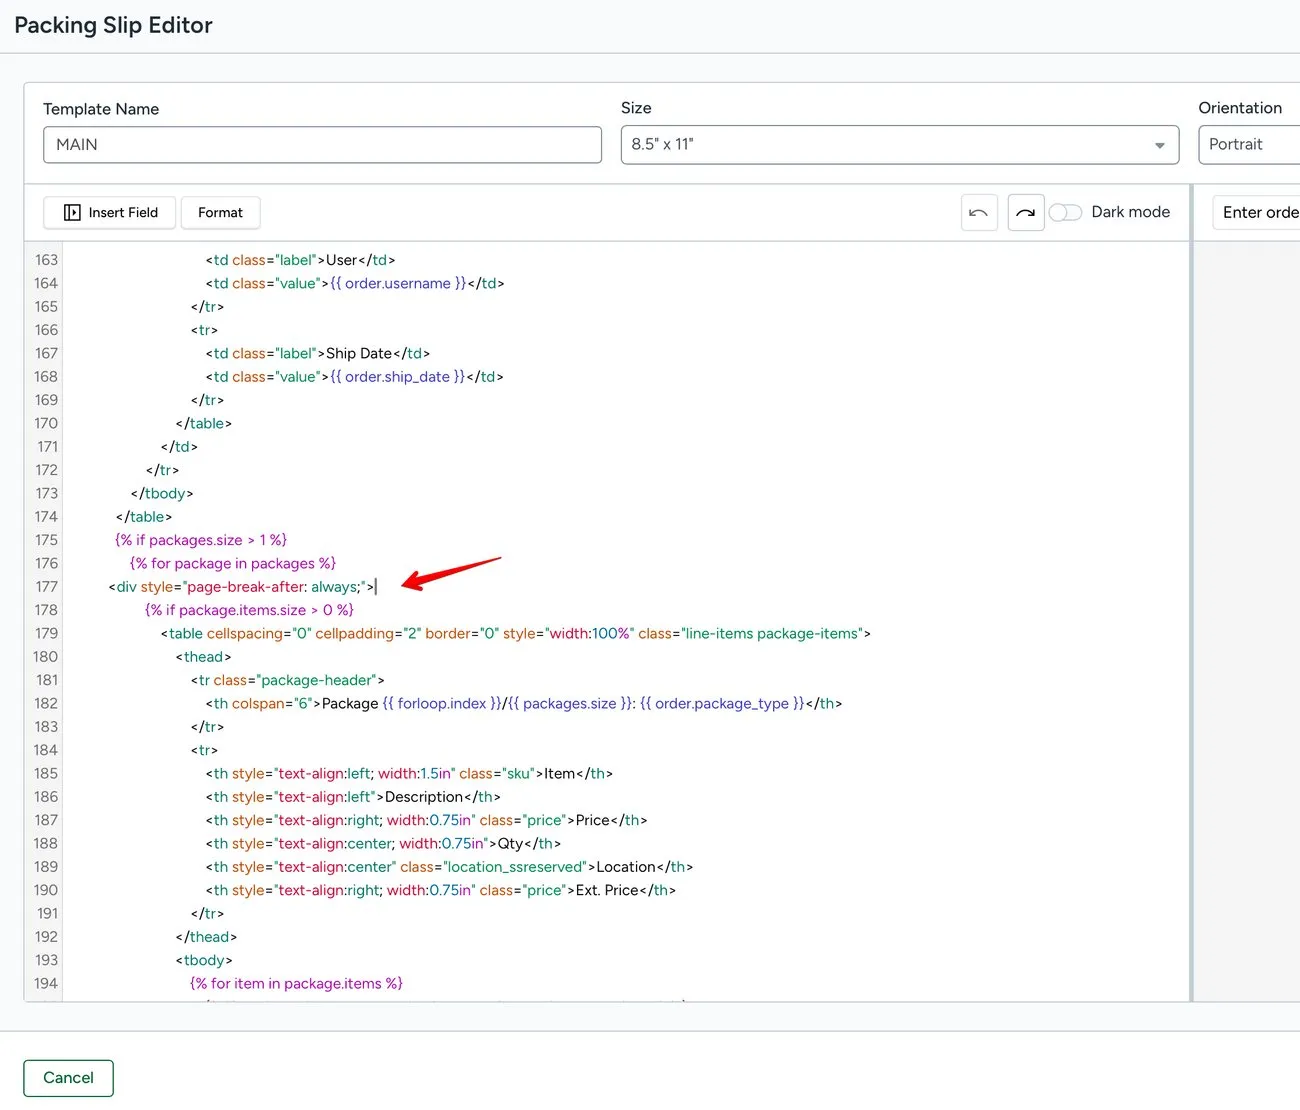
Then close it just before the loop ends, after the endif that closes the table:
      {% endif %}
    </div>
  {% endfor %}
{% else %}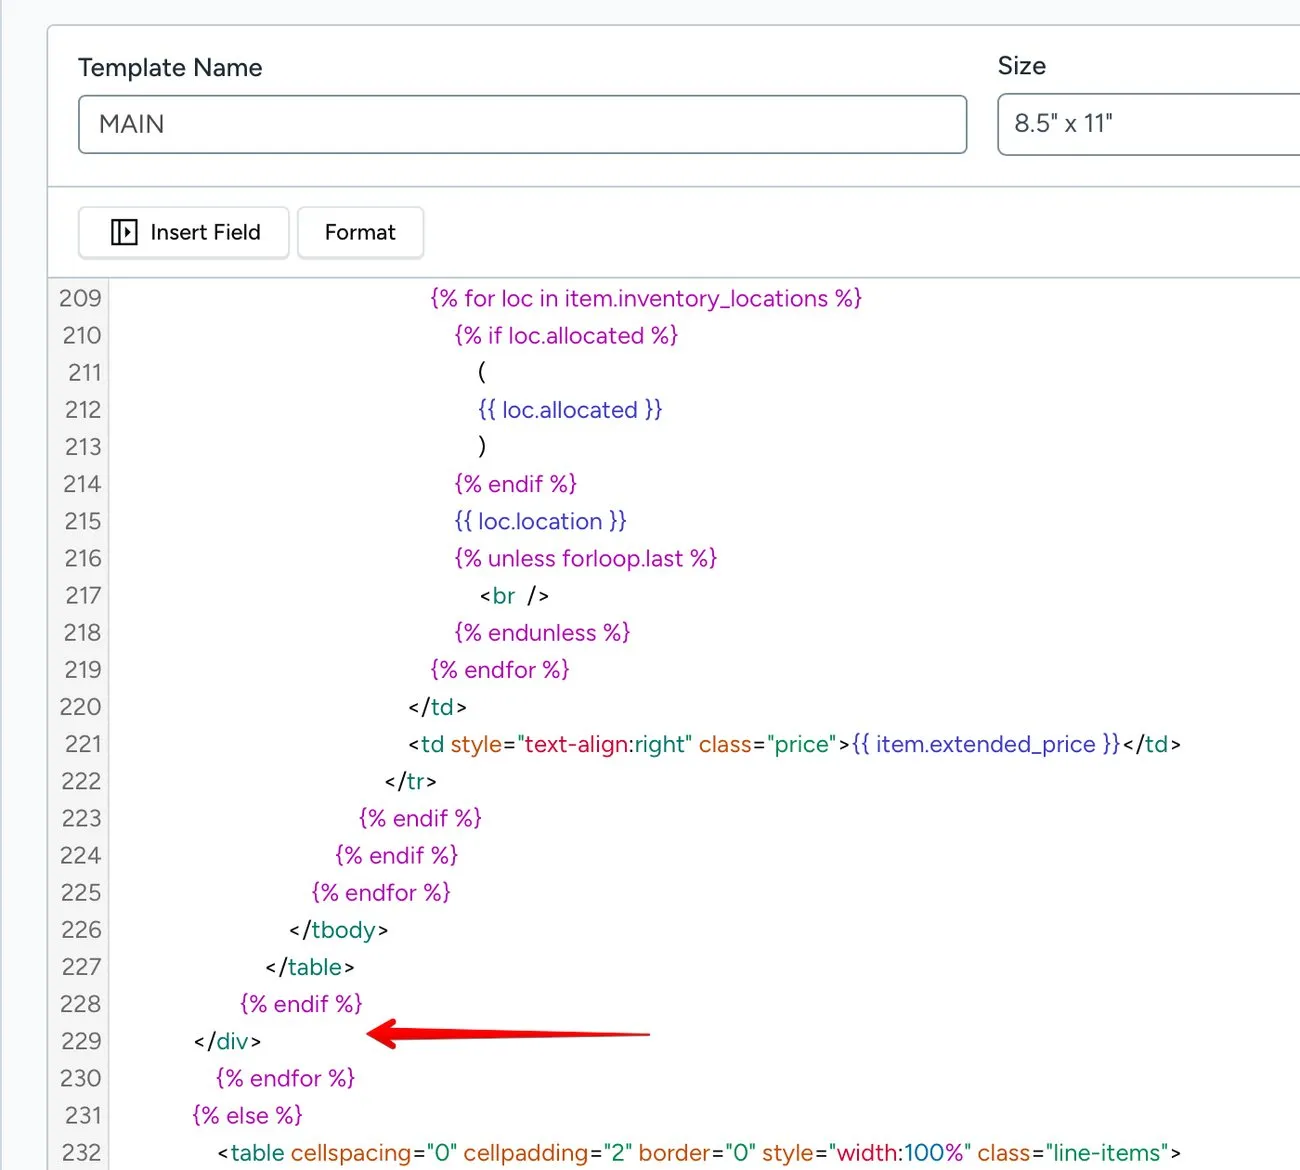
To test it, type an order number into the preview box above the right-hand pane. A two-package order shows two pages, each headed with its package number:
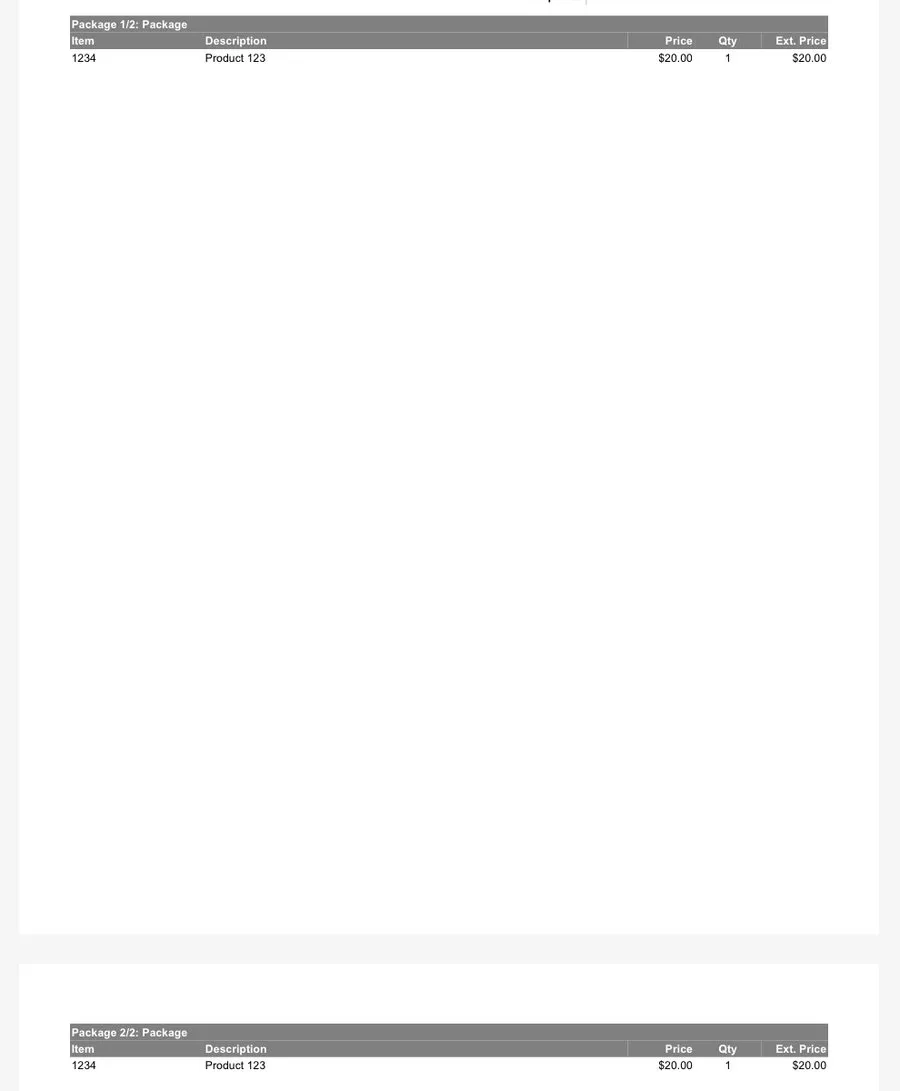
That preview also shows the next problem. The default header gives only the package number, so I added {{ order.package_type }} to it, hoping for the box name. It printed the generic word “Package” instead.
Print the real box name
Choosing a saved package doesn’t help, because on a multi-package shipment the slip only gets that package’s dimensions. So the template has to turn the dimensions back into a name.
Put this directly after the <div style="page-break-after: always;"> line, and replace the example boxes with your own:
{% assign package_name = 'Check box size' %}
{% assign length_key = package.length | times: 10 | round %}
{% assign width_key = package.width | times: 10 | round %}
{% assign height_key = package.height | times: 10 | round %}
{% assign dimensions_key = length_key | append: 'x' | append: width_key | append: 'x' | append: height_key %}

{% case dimensions_key %}
  {% when '120x90x60', '120x60x90', '90x120x60', '90x60x120', '60x120x90', '60x90x120' %}
    {% assign package_name = 'Medium box' %}
  {% when '100x70x70', '70x100x70', '70x70x100' %}
    {% assign package_name = 'Small box' %}
  {% when '60x60x60' %}
    {% assign package_name = 'Cube box' %}
  {% when '145x190x30', '145x30x190', '190x145x30', '190x30x145', '30x145x190', '30x190x145' %}
    {% assign package_name = 'Poly mailer 14.5 x 19' %}
{% endcase %}
Then replace the <th> in the package header so it prints the name:
<th colspan="6">Package {{ forloop.index }}/{{ packages.size }}: {{ package_name }}</th>Each part of that is there for a reason:
- Multiplying by 10 removes the decimal, so a 14.5 inch side becomes 145. If your boxes use quarter inches, multiply by 100 and write the keys to match.
- Every ordering is listed because someone typing dimensions by hand won’t always enter them in the same order. A box with three different sides has six orderings, a box with two equal sides has three, and a cube has one.
- The starting value means an unrecognised size prints “Check box size” on the slip instead of leaving the header blank, so a typo gets noticed at the bench.
What to check before you rely on it
Preview the orders that are most likely to go wrong: a single-package order, a multi-package order with every item assigned, and a multi-package order with one package left empty. Then print one, because the printed pages are what your packers get.
The box names now live in the template, so a new box size means a new line in the case.
Where multi-box orders are routine, the harder question is how the order should be divided in the first place. The Recommend Package rule action works that out for fit. Pro Automation works it out for cost, pricing the possible splits and picking the one that costs least.
For operations past what rules can do
Multi-box orders on every shift?
Pro Automation decides how each order is divided and keeps those decisions right as your catalogue changes.